Monday, November 16, 2015

Create entity objects from DB schema using IntelliJ IDEA

 If you have a database schema and needs to create the entity objects matching the schema, Intellij IDEA can help you! All you have to to is follow this simple guide.

 Setup data source

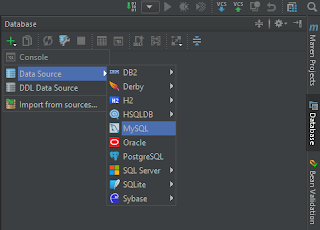
Start by adding a data source to the project, by clicking the "Database" tab in the right hand side of Intellij.
Click the green plus, navigate to "Data Source" and choose "MySQL".
 Enter the data source info for the db you wish to connect to and click OK.

Add framework support

Add framework support by right clicking the project.

Choose framework

Choose "JavaEE Persistence" as framework. Set version to 2.1, provider to Hibernate and click OK. A persistence.xml file will be created, which can be deleted after entity objects has been created.

Assign data source

A new tab should be added in the left hand side of IntelliJ, named "Persistence". Click it and a new Persistence frame opens. Right click the persistance unit (ticketing-core) and choose "Assign Data Sources..."

Select data source

Assign a data source to the persistence unit and click OK.

Generate mapping

Generate a mapping by right clicking the persistence unit and choose "Generate Persistence Mapping" and then "By Database Schema".

Choose entities

Choose a data source, package and the schemas, click OK and Yes in the pop up. You should now have some some nice entity objects with basic mapping annotations!


Wednesday, May 20, 2015

Various Java trips and tricks

This blog will list some nice tips and tricks that is good to know.

Classpath resource to java.net.URL

To get a java.net.URL from a classpath resource do:
 URL url = getClass().getClassLoader().getResource("some.file");  

Classpath resource to java.io.InputStream

 To get a java.io.InputStream from a classpath resource do:
 InputStream resourceAsStream = getClass().getClassLoader().getResourceAsStream();  

Classpath resource to java.io.File

 To get a java.io.File from a classpath resource do:
 File file = new File(this.getClass().getResource("some.file").toURI());  

Iterate through a Map

 for (Map.Entry<String, String> entry : map.entrySet()) {  
   System.out.println(entry.getKey() + "/" + entry.getValue());  
 }  

Find current root directory

 File rootDirectory = new File(System.getProperty("user.dir")); 

Sunday, April 19, 2015

Connecting to MongoDB using Spring Data

In this blog I will show how easy you can connect to a MongoDB using Spring Data. For installation of MongoDB, go to http://docs.mongodb.org/manual/installation/

The dependencies needed besides standard Spring dependencies are spring-data-mongo and mongo-java-driver.
 <dependency>  
     <groupId>org.mongodb</groupId>  
     <artifactId>mongo-java-driver</artifactId>  
     <version>2.12.4</version>  
 </dependency>  
 <dependency>  
     <groupId>org.springframework.data</groupId>  
     <artifactId>spring-data-mongodb</artifactId>  
     <version>1.6.0.RELEASE</version>  
 </dependency>  

First lets create some domain objects. Department is a simple object with only only one attribute representing a department.

 public class Department {  
   
     private final String name;  
   
     public Department(String name) {  
         this.name = name;  
     }  
   
     @Override  
     public String toString() {  
         return "Department [name=" + this.name + "]";  
     }  
 }  
Second domain object is Person, which holds a reference to Department. Is also has an @Id which can be used for retrieval.
 import org.springframework.data.annotation.Id;  
 import java.util.UUID;  
   
 public class Person {  
   
   @Id  
   private final UUID id;  
   private final String name;  
   private final String title;  
   private final Department department;  
   
   public Person(String name, String title, Department department) {  
     this.id = UUID.randomUUID();  
     this.name = name;  
     this.title = title;  
     this.department = department;  
   }  
   
   public UUID getId() {  
     return this.id;  
   }  
   
   @Override  
   public String toString() {  
     return "Person{" +  
         "department=" + department +  
         ", id=" + id +  
         ", name='" + name + '\'' +  
         ", title='" + title + '\'' +  
         '}';  
   }  
 }  

Next we need a configuration that connects to the MongoDB and exposes a MongoTemplate that can be injected into repository beans.
 import org.springframework.data.mongodb.MongoDbFactory;  
 import org.springframework.data.mongodb.core.MongoTemplate;  
 import org.springframework.data.mongodb.core.SimpleMongoDbFactory;    
 import com.mongodb.DB;  
 import com.mongodb.MongoClient;  
   
 @Configuration  
 @ComponentScan("com.blogspot.jpdevelopment.mongodb")  
 public class MongoDbConfig {  
   
     @Bean  
     public MongoClient mongoClient() throws UnknownHostException {  
         return new MongoClient("localhost");  
     }  
   
     @Bean  
     public DB db() throws UnknownHostException {  
         return mongoClient().getDB("test");  
     }  
   
     @Bean  
     public MongoDbFactory mongoDbFactory() throws UnknownHostException {  
         return new SimpleMongoDbFactory(mongoClient(), "test");  
     }  
   
     @Bean  
     public MongoTemplate mongoTemplate() throws UnknownHostException {  
         return new MongoTemplate(mongoDbFactory());  
     }  
 }  
After setting up the configuration, we can create a Repository.The MongoTemplate is injected and opens up to all CRUD actions.
 import org.springframework.data.mongodb.core.MongoTemplate;  
 import org.springframework.data.mongodb.core.query.Criteria;  
 import org.springframework.data.mongodb.core.query.CriteriaDefinition;  
 import org.springframework.data.mongodb.core.query.Query;  
 import org.springframework.stereotype.Repository;  
 import java.util.UUID;  
   
 @Repository  
 public class PersonRepository {  
   
     private static final String PERSON_COLLENCTION = "person";  
   
     @Autowired  
     private MongoTemplate template;  
   
     public Person findOne(UUID id) {  
         CriteriaDefinition criteriaDefinition = Criteria.where("id").is(id);  
         Query query = new Query();  
         query.addCriteria(criteriaDefinition);  
         return this.template.findOne(query, Person.class, PERSON_COLLENCTION);  
     }  
   
     public Person save(Person person) {  
         template.save(person);  
         return person;  
     }  
 }  
Finally lets take it for a spin. Spring is started and the Repository bean is fetched from the ApplicationContext. 
First a new Person is stored and then again fetched as a new object and printed.
 public class Main {  
   
     public static void main(String[] args) {  
         AnnotationConfigApplicationContext ctx = new AnnotationConfigApplicationContext(MongoDbConfig.class);  
   
         PersonRepository personRepository = ctx.getBean(PersonRepository.class);  
         Person newPerson = new Person("Jonas", "Developer", new Department("Dev"));  
         personRepository.save(newPerson);  
   
         Person storedPerson = personRepository.findOne(newPerson.getId());  
         System.out.println(storedPerson);  
   
     }  
 }  
The output will look like this:
 Person{department=Department [name=Dev], id=9ae44c1d-a38e-4364-9848-2d7dd6538444, name='Jonas', title='Developer'}  
That was the very basic of connection to MongoDB from Java using Spring Data.
Tuesday, January 13, 2015

Spring CXF endpoint configuration in pure Java

A Spring CXF endpoint configuration in XML looks something like below.

 <import resource="classpath:META-INF/cxf/cxf.xml" />  
 <import resource="classpath:META-INF/cxf/cxf-extension-soap.xml" />  
 <import resource="classpath:META-INF/cxf/cxf-servlet.xml" />  
        
 <bean id="soapServiceImpl" class="SoapServiceImpl"/>  
   
 <jaxws:endpoint id="soapServiceEndpoint"  
      implementor="#soapServiceImpl" address="/soapService">  
 </jaxws:endpoint>  

To do this configuration in pure Java, simply annotate the web service with @Service and make a configuration file like below.
 import org.apache.cxf.Bus;  
 import org.apache.cxf.jaxws.EndpointImpl;  
 import org.springframework.context.annotation.Bean;  
 import org.springframework.context.annotation.Configuration;  
 import org.springframework.context.annotation.ImportResource;  
 import javax.xml.ws.Endpoint;  
   
 @Configuration  
 @ImportResource({  
     "classpath:META-INF/cxf/cxf.xml",  
     "classpath:META-INF/cxf/cxf-extension-soap.xml",  
     "classpath:META-INF/cxf/cxf-servlet.xml" })  
 public class CXFConfig {  
   
   @Bean  
   public Endpoint soapServiceEndpoint(Bus cxfBus, SoapService soapService) {  
     EndpointImpl endpoint = new EndpointImpl(cxfBus, soapService);  
     endpoint.setAddress("/soapService");  
     endpoint.publish();  
     return endpoint;  
   }  
 }  

If component scan of @Service, @Repository and @Component is not already active this can be done be adding:
 <context:component-scan annotation-config="true" base-package="package.to.scan" />