import javax.ws.rs.Produces;
import javax.ws.rs.core.MediaType;
import javax.ws.rs.ext.ContextResolver;
import javax.ws.rs.ext.Provider;

import org.codehaus.jackson.map.ObjectMapper;
import org.codehaus.jackson.map.SerializationConfig;

/**
 * This class will make sure JSON timestamps is written in the format yyyy-MM-dd'T'hh:mm:ss'Z'
 */

@Provider
@Produces(MediaType.APPLICATION_JSON)
public class JacksonConfig implements ContextResolver<ObjectMapper> {

 private final ObjectMapper objectMapper;

 public JacksonConfig() {
  objectMapper = new ObjectMapper();
  objectMapper.configure(
    SerializationConfig.Feature.WRITE_DATES_AS_TIMESTAMPS, false);
 }

 @Override
 public ObjectMapper getContext(Class<?> objectType) {
  return objectMapper;
 }
}
Sunday, March 9, 2014
RESTEasy format timestamps as date
By default RESTEasy using Jackson will format a java.util.Date as a unix-timestamp. To change it into ISO_8601 formar, yyyy-MM-dd'T'hh:mm:ss'Z', simply create a class
Configur Eclipse to use WildFly 8
In order to configure Wildfly/JBoss from Eclipse, start by installing the plugin "JBoss Tools" from Eclipse Marketplace. You only need to install JBossAS Tools, but you may install everything if you like:
After installing and restarting eclipse, go to File | New | Server and expand the JBoss Community option. Choose "WildFly 8 (Experimental)" and click Next:
Now choose the location for the WildFly 8 installation and a JRE.
Remember that WildFly requires a JDK 1.7, therefore you will not be able to start it with an older JDK version.
The wizard will now ask if you wish to deploy a project. Choose the project you wish to deploy and click Add >.
Click Finish. WildFly 8 is now configured on your Eclipse environment!
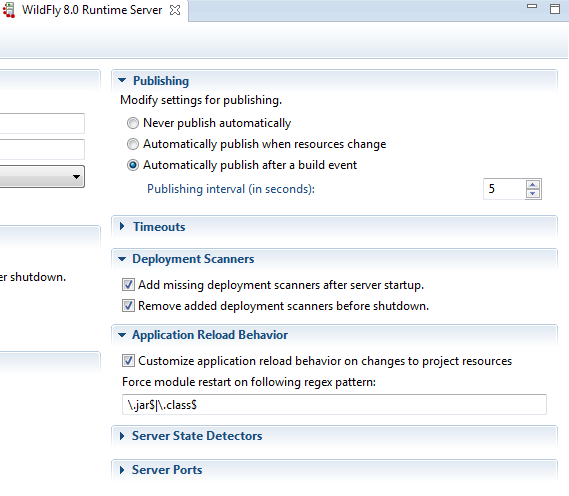
To enable automatic publishing of code changes, double click the server in the server tab:
This will open a server configuration window. In the "Publishing" section, set to check "Automatically publish after a build event" and set the interval to whatever fits you. In my experiences, 5 seconds works best.
Finally change the value in the "Application Reload Behavior" section to: "\.jar$|\.class$"
Happy developing!
Subscribe to:
Comments (Atom)


