Sunday, April 19, 2015

Connecting to MongoDB using Spring Data

In this blog I will show how easy you can connect to a MongoDB using Spring Data. For installation of MongoDB, go to http://docs.mongodb.org/manual/installation/

The dependencies needed besides standard Spring dependencies are spring-data-mongo and mongo-java-driver.
 <dependency>  
     <groupId>org.mongodb</groupId>  
     <artifactId>mongo-java-driver</artifactId>  
     <version>2.12.4</version>  
 </dependency>  
 <dependency>  
     <groupId>org.springframework.data</groupId>  
     <artifactId>spring-data-mongodb</artifactId>  
     <version>1.6.0.RELEASE</version>  
 </dependency>  

First lets create some domain objects. Department is a simple object with only only one attribute representing a department.

 public class Department {  
   
     private final String name;  
   
     public Department(String name) {  
         this.name = name;  
     }  
   
     @Override  
     public String toString() {  
         return "Department [name=" + this.name + "]";  
     }  
 }  
Second domain object is Person, which holds a reference to Department. Is also has an @Id which can be used for retrieval.
 import org.springframework.data.annotation.Id;  
 import java.util.UUID;  
   
 public class Person {  
   
   @Id  
   private final UUID id;  
   private final String name;  
   private final String title;  
   private final Department department;  
   
   public Person(String name, String title, Department department) {  
     this.id = UUID.randomUUID();  
     this.name = name;  
     this.title = title;  
     this.department = department;  
   }  
   
   public UUID getId() {  
     return this.id;  
   }  
   
   @Override  
   public String toString() {  
     return "Person{" +  
         "department=" + department +  
         ", id=" + id +  
         ", name='" + name + '\'' +  
         ", title='" + title + '\'' +  
         '}';  
   }  
 }  

Next we need a configuration that connects to the MongoDB and exposes a MongoTemplate that can be injected into repository beans.
 import org.springframework.data.mongodb.MongoDbFactory;  
 import org.springframework.data.mongodb.core.MongoTemplate;  
 import org.springframework.data.mongodb.core.SimpleMongoDbFactory;    
 import com.mongodb.DB;  
 import com.mongodb.MongoClient;  
   
 @Configuration  
 @ComponentScan("com.blogspot.jpdevelopment.mongodb")  
 public class MongoDbConfig {  
   
     @Bean  
     public MongoClient mongoClient() throws UnknownHostException {  
         return new MongoClient("localhost");  
     }  
   
     @Bean  
     public DB db() throws UnknownHostException {  
         return mongoClient().getDB("test");  
     }  
   
     @Bean  
     public MongoDbFactory mongoDbFactory() throws UnknownHostException {  
         return new SimpleMongoDbFactory(mongoClient(), "test");  
     }  
   
     @Bean  
     public MongoTemplate mongoTemplate() throws UnknownHostException {  
         return new MongoTemplate(mongoDbFactory());  
     }  
 }  
After setting up the configuration, we can create a Repository.The MongoTemplate is injected and opens up to all CRUD actions.
 import org.springframework.data.mongodb.core.MongoTemplate;  
 import org.springframework.data.mongodb.core.query.Criteria;  
 import org.springframework.data.mongodb.core.query.CriteriaDefinition;  
 import org.springframework.data.mongodb.core.query.Query;  
 import org.springframework.stereotype.Repository;  
 import java.util.UUID;  
   
 @Repository  
 public class PersonRepository {  
   
     private static final String PERSON_COLLENCTION = "person";  
   
     @Autowired  
     private MongoTemplate template;  
   
     public Person findOne(UUID id) {  
         CriteriaDefinition criteriaDefinition = Criteria.where("id").is(id);  
         Query query = new Query();  
         query.addCriteria(criteriaDefinition);  
         return this.template.findOne(query, Person.class, PERSON_COLLENCTION);  
     }  
   
     public Person save(Person person) {  
         template.save(person);  
         return person;  
     }  
 }  
Finally lets take it for a spin. Spring is started and the Repository bean is fetched from the ApplicationContext. 
First a new Person is stored and then again fetched as a new object and printed.
 public class Main {  
   
     public static void main(String[] args) {  
         AnnotationConfigApplicationContext ctx = new AnnotationConfigApplicationContext(MongoDbConfig.class);  
   
         PersonRepository personRepository = ctx.getBean(PersonRepository.class);  
         Person newPerson = new Person("Jonas", "Developer", new Department("Dev"));  
         personRepository.save(newPerson);  
   
         Person storedPerson = personRepository.findOne(newPerson.getId());  
         System.out.println(storedPerson);  
   
     }  
 }  
The output will look like this:
 Person{department=Department [name=Dev], id=9ae44c1d-a38e-4364-9848-2d7dd6538444, name='Jonas', title='Developer'}  
That was the very basic of connection to MongoDB from Java using Spring Data.

Tuesday, January 13, 2015

Spring CXF endpoint configuration in pure Java

A Spring CXF endpoint configuration in XML looks something like below.

 <import resource="classpath:META-INF/cxf/cxf.xml" />  
 <import resource="classpath:META-INF/cxf/cxf-extension-soap.xml" />  
 <import resource="classpath:META-INF/cxf/cxf-servlet.xml" />  
        
 <bean id="soapServiceImpl" class="SoapServiceImpl"/>  
   
 <jaxws:endpoint id="soapServiceEndpoint"  
      implementor="#soapServiceImpl" address="/soapService">  
 </jaxws:endpoint>  

To do this configuration in pure Java, simply annotate the web service with @Service and make a configuration file like below.
 import org.apache.cxf.Bus;  
 import org.apache.cxf.jaxws.EndpointImpl;  
 import org.springframework.context.annotation.Bean;  
 import org.springframework.context.annotation.Configuration;  
 import org.springframework.context.annotation.ImportResource;  
 import javax.xml.ws.Endpoint;  
   
 @Configuration  
 @ImportResource({  
     "classpath:META-INF/cxf/cxf.xml",  
     "classpath:META-INF/cxf/cxf-extension-soap.xml",  
     "classpath:META-INF/cxf/cxf-servlet.xml" })  
 public class CXFConfig {  
   
   @Bean  
   public Endpoint soapServiceEndpoint(Bus cxfBus, SoapService soapService) {  
     EndpointImpl endpoint = new EndpointImpl(cxfBus, soapService);  
     endpoint.setAddress("/soapService");  
     endpoint.publish();  
     return endpoint;  
   }  
 }  

If component scan of @Service, @Repository and @Component is not already active this can be done be adding:
 <context:component-scan annotation-config="true" base-package="package.to.scan" />  

Wednesday, November 5, 2014

Java data type conversion

Java auto boxing is a nice feature but it can sometimes cause a lot of problems, especially when going from Object to primitive. A NullPointerException can be very hard to spot, because it can be throw in strange places where you normally would not expect it. See this for some auto boxing errors.
This blog will list some nice data type conversion between different data type and from primitive and Object type and vise versa.

Integer/int conversion
See examples here. 

Data type from, to Use Comment
int to Integer int i = 10; 
Integer intObj = Integer.valueOf(i);

int to Long int i = 10;
Long longObj= Long.valueOf(i);

int to long int i = 10;
long l = (long) i;

int to String int i = 10;
String s = Integer.toString(i);

Integer to int Integer intObj = new Integer(10);
int i = intObj.intValue();
NumberFormatException will be thrown if the intObj is a null Integer.
Integer to String Integer intObj = new Integer(10);
String s = intObj.toString();
NumberFormatException will be thrown if the intObj is a null Integer.
Integer to long Integer intObj = new Integer(10);
long l = intObj.longValue();
NumberFormatException will be thrown if the intObj is a null Integer.
Integer to Long Integer intObj = new Integer(10);
Long longObj = Long.valueOf(intObj.longValue());
NumberFormatException will be thrown if the intObj is a null Integer.

Long/long conversion
Careful when converting from Long/long to Integer/int. No exception is thrown if the Long value is bigger than Integer.MAX_VALUE or smaller than Integer.MIN_VALUE. It will simple do an int overflow and the output will be unexpected.
See examples here
long to Long long l = 10L;
Long longObj = Long.valueOf(l);

long to Integer long l = 10L;
Integer intObj = Integer.valueOf(Long.valueOf(l).intValue());
No really good way of doing this. Overflow may occur.
long to String long l = 10L;
String s = Long.toString(l);

long to int long l = 10L;
int i = (int) l;
Use simple cast.
Overflow may occur.
Long to long Long longObj = new Long(10L);
long l = longObj.longValue();
NumberFormatException will be thrown if the longObj is a null Long.
Long to String Long longObj = new Long(10L);
String s = longObj.toString();

Long to Integer Long longObj = new Long(10L);
Integer intObj = Integer.valueOf(longObj.intValue());
No really good way of doing this. Overflow may occur.
Long to int Long longObj = new Long(10L);
int i = longObj.intValue();
Overflow may occur.

Saturday, October 18, 2014

Spring JPA/Hibernate configuration without XML

With the lovely spring feature @Configuration you can now completely drop all XML configuration. In this blog I will go through how to configure JPA/Hibernate and get rid of XML bean configuration and the persistence.xml often used with JPA. Start by instrumenting the configuration class with:

  @Configuration   
  @EnableJpaRepositories(basePackages = "com.blogspot.jpdevelopment.immutable.hibernate")   
  @EnableTransactionManagement   
  public class JpaConfig {   


@Configuration Indicates that a class declares one or more @Bean methods and may be processed by the Spring container.

@EnableJpaRepositories Will scan the package of the annotated configuration class for Spring Data repositories. This means classes annotated with @Repository.

@EnableTransactionManagement Enables Spring's annotation-driven transaction management capability, similar to the support found in Spring's <tx:*> XML namespace. Typically the XML configuration looks like this:

 <tx:annotation-driven transaction-manager="transactionManager"/>  

Now it's time to declare beans. A javax.sql.DataSource bean is needed.
 @Bean  
 public DataSource dataSource() {  
      BasicDataSource dataSource = new BasicDataSource();  
      dataSource.setDriverClassName("com.mysql.jdbc.Driver");  
      dataSource.setUrl("jdbc:mysql://localhost:3306/test");  
      dataSource.setUsername("root");  
      return dataSource;  
 }  

Next we need a JpaVendorAdapter. This serves as single configuration point for all vendor-specific properties.

 @Bean  
 public JpaVendorAdapter jpaVendorAdapter() {  
      HibernateJpaVendorAdapter hibernateJpaVendorAdapter = new HibernateJpaVendorAdapter();  
      hibernateJpaVendorAdapter.setShowSql(false);  
      hibernateJpaVendorAdapter.setGenerateDdl(true);  
      hibernateJpaVendorAdapter.setDatabase(Database.MYSQL);  
   
      return hibernateJpaVendorAdapter;  
 }  

With the datasource and jpaVendorAdaptor in place we can make a LocalContainerEntityManagerFactoryBean. This will expose a EntityManagerFactory and inject it in the classes defined in the packagesToScan.
 @Bean  
 public LocalContainerEntityManagerFactoryBean entityManagerFactory() {  
      LocalContainerEntityManagerFactoryBean entityManagerFactoryBean = new LocalContainerEntityManagerFactoryBean();  
      entityManagerFactoryBean.setDataSource(dataSource());  
      entityManagerFactoryBean.setJpaVendorAdapter(jpaVendorAdapter());  
      entityManagerFactoryBean.setPackagesToScan("com.blogspot.jpdevelopment.immutable.hibernate");  
      return entityManagerFactoryBean;  
 }   

Finally we need a PlatformTransactionManager.

 @Bean  
 public PlatformTransactionManager transactionManager() {  
      return new JpaTransactionManager(entityManagerFactory().getObject());  
 }  


Now lets the it for a spin and make a repository. A simple way to get started is to use the CrudRepository interface.

 @Repository  
 public interface PersonRepository extends CrudRepository<Person, UUID> {  
 }  

And the implementation.

 public class PersonAccessRepository implements PersonRepository {  
   
      @PersistenceContext  
      private EntityManager entityManager;  
   
      @Override  
      public Person findOne(UUID id) {  
           return this.entityManager.find(Person.class, id);  
      }  
   
      @Transactional  
      @Override  
      public <S extends Person> S save(S person) {  
           this.entityManager.persist(person);  
           return person;  
      }  
 }  


Full example with dependencies and executable code can be found here.

Working with immutable objects and hibernate

To support a rich domain model, it's often a good idea to make domain objects immutable. Hibernate if however not happy about this. It works best with objects who only has a default constructor and getter and setters for all fields. 
To make hibernate work with immutable objects, declare a default constructor with at least package level visibility. 
If mapping-annotations is placed on fields the access type will be AccessType.FIELD. If placed on methods the access type will be AccessType.PROPERTY. Field type access is needed by hibernate for handling final attributes.
 
 @Entity  
 @Table(name = "person")  
 public class Person {  
   
      @Id  
      @Column(columnDefinition = "BINARY(16)", length = 16)  
      private final UUID id;  
      private final Date creationDate;  
      private final String firstname;  
      private final String lastname;  
   
      // Hibernate needs this or it will fail with an InstantiationException  
      private Person() {  
           this.id = UUID.randomUUID();  
           this.creationDate = new Date();  
           this.firstname = null;  
           this.lastname = null;  
      }  
   
      public Person(String firstname, String lastname) {  
           this.id = UUID.randomUUID();  
           this.creationDate = new Date();  
           this.firstname = firstname;  
           this.lastname = lastname;  
      }  
 }  

If you are using XML mappings, this can also be done by setting:

<hibernate-mapping default-access="field" package="com.blogspot.jpdevelopment.immutable.hibernate.core.domain">

A full example is available here.

Sunday, March 9, 2014

RESTEasy format timestamps as date

By default RESTEasy using Jackson will format a java.util.Date as a unix-timestamp. To change it into ISO_8601 formar, yyyy-MM-dd'T'hh:mm:ss'Z', simply create a class
import javax.ws.rs.Produces;
import javax.ws.rs.core.MediaType;
import javax.ws.rs.ext.ContextResolver;
import javax.ws.rs.ext.Provider;

import org.codehaus.jackson.map.ObjectMapper;
import org.codehaus.jackson.map.SerializationConfig;

/**
 * This class will make sure JSON timestamps is written in the format yyyy-MM-dd'T'hh:mm:ss'Z' 
 */

@Provider
@Produces(MediaType.APPLICATION_JSON)
public class JacksonConfig implements ContextResolver<ObjectMapper> {

 private final ObjectMapper objectMapper;

 public JacksonConfig() {
  objectMapper = new ObjectMapper();
  objectMapper.configure(
    SerializationConfig.Feature.WRITE_DATES_AS_TIMESTAMPS, false);
 }

 @Override
 public ObjectMapper getContext(Class<?> objectType) {
  return objectMapper;
 }
}

Configur Eclipse to use WildFly 8

In order to configure Wildfly/JBoss from Eclipse, start by installing the plugin "JBoss Tools" from Eclipse Marketplace. You only need to install JBossAS Tools, but you may install everything if you like:
After installing and restarting eclipse, go to File | New | Server and expand the JBoss Community option. Choose "WildFly 8 (Experimental)" and click Next
Now choose the location for the WildFly 8 installation and a JRE.

Remember that WildFly requires a JDK 1.7, therefore you will not be able to start it with an older JDK version.


The wizard will now ask if you wish to deploy a project. Choose the project you wish to deploy and click Add >.

Click Finish. WildFly 8 is now configured on your Eclipse environment! 
To enable automatic publishing of code changes, double click the server in the server tab:

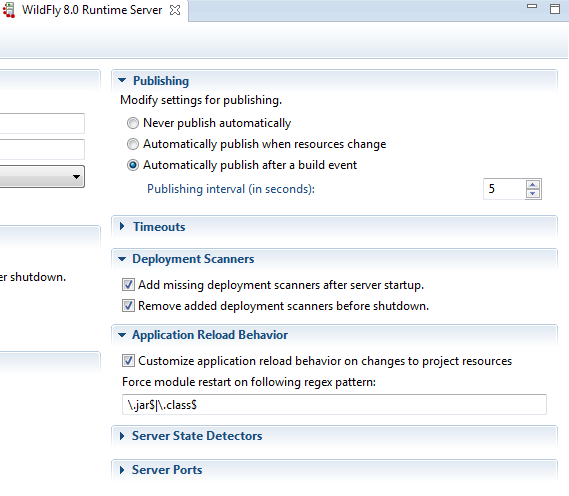
This will open a server configuration window. In the "Publishing" section, set to check "Automatically publish after a build event" and set the interval to whatever fits you. In my experiences, 5 seconds works best. 
Finally change the value in the "Application Reload Behavior" section to: "\.jar$|\.class$"


Happy developing!